Help
Getting Started:
Use City GIS Rajkot - Citizen Portal on your computer, phone, or tablet, to explore and find more about
Rajkot your Smart City. Here's a guide to get you started using City GIS Rajkot citizen Portal
Note: Icons of all the functionalities are available on the menu bar at the top of the portal.
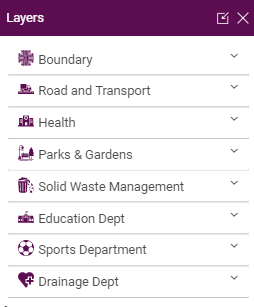
Layers
A group layer is collection of all features /facilities that fall within a category. You can select layer to
view its related data to find out location(s) and information of particular features/facilities.
1. Click layers from top menu bar of citizen portal.
2. On the widget you can view and expand all the group layer categories listed
3. By clicking the drop down icon associated with each group layer you can view all selected
feature layers or you can hide the grouped layers.
4. Mark the checkbox to individual feature layer for you wants to view on the map. All the features
of the selected layer get populated on the map area.
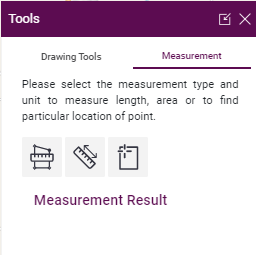
Tools
You can get the drawing and measurement tools from the Tools available in top panel. Click on Tool on top panel of citizen portal you will get the
Drawing Tool:
1. Select the type of draw mode you want to use from the Drawing tool. For example, when you
click on the Line string button, the tool activates the line geometry.
2. Move the mouse pointer over the map and click to add graphic/geometry on the map.
3. You can now view the graphic/geometry on the map, and also print this.
4. You can clear ,undo and Redo from option available
Note: Some graphics may require more than one click or a click and drag.
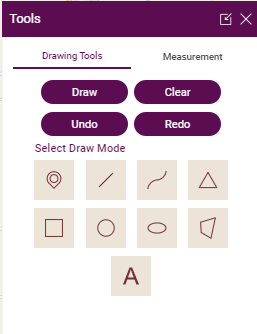
5. Click Measurement from the tools option
6. Choose Measure Type (Line, Polygon, Point), and Measurement Unit.
7. Click on your map at the starting point. Move your cursor to your end point, or next point,
repeating until you are done. Double click to finish. In case of location, click on a point to view
the coordinates of the location.
8. When done, the measurement result is available on the widget and Map.
9. You can also print the maps
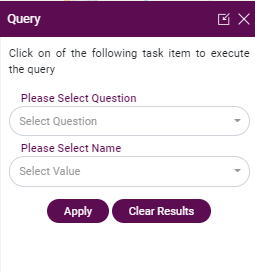
Query
Queries helps you identify and focus on a set of pre-defined features and find relevant information
regarding the inquiry, such as find ward by corporate name, find school by name, and find hospital by name
1. Click on query from top menu bar of citizen portal.
2. Select question for you want to query from drop down list
3. Select value from drop down list.
4. After clicking apply, the result will display on the map.
5. You can navigate to queried features by clicking get direction tab.
6. You can also view the other information of features by clicking the view other information.
7. By clicking clear result you can clear the results.
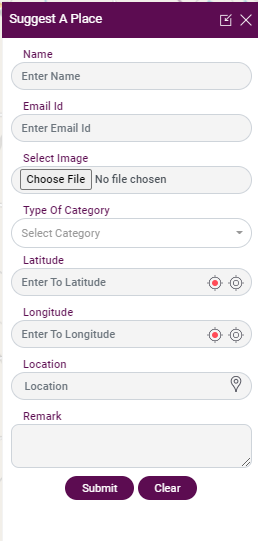
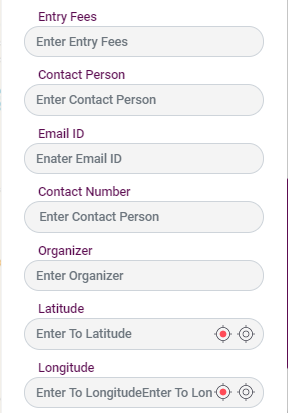
Suggest a Place
This feature is used for suggesting a place in the portal and its process is as follows,
1. User needs to enter name.
2. User needs to enter email id.
3. User needs to add the image of place which is optional.
4. User needs to enter latitude
5. User needs to enter longitude
6. User needs to enter location
7. User needs to enter remarks
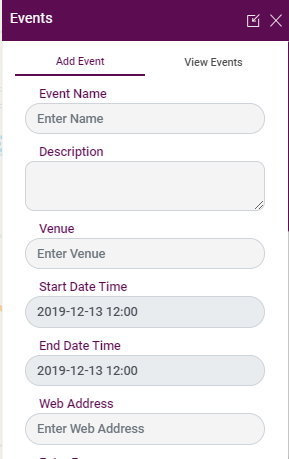
Events
Add your public event in Citizen Portal of Rajkot for it to feature in our portal for public to view.
1. Click RMC service the menu bar on top of the portal.
2. Then Click on Event Planner
3. Fill in the Add Event form with particulars of the public event.
4. Search for your event vanue and click it on the map to set location coordinates for your event.
5. Browse and choose event image file.
6. Click on Submit to send the request for add event to the administrator.
7. Click Reset to start a fresh on the form.
8. Once the administrator approves of the event, all Smart Map Rajkot users can view your event
in Events module.
Note: The display of event added is subject to approval of administrator.
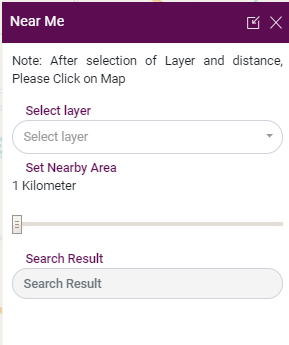
Near Me
Direction allows you to get shortest path from one location to another location
1. Click on Direction from the menu bar on top of the portal
2. You can set the source by search the location name from search box, by plotting the point or by
getting the current location.
3. You can set the Destination by search the location name from search box, by plotting the point
or by getting the current location.
4. Now, click on get direction to find the best path from source to destination
5. You can clear the direction from clear direction
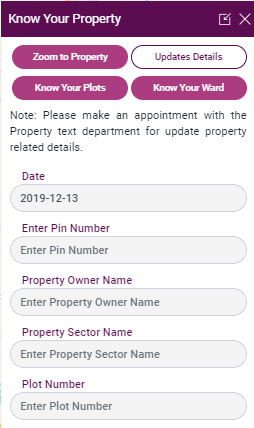
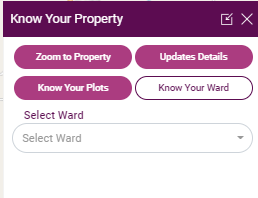
Know your Property
Zoom to Property
1. Click Zoom to property from the tab.
2. On Know Your Property widget, choose attribute to search property by (Sector, Sub sector, plot
number or by owner name or address.
3. Now, select the attribute value of the property from the dropdown. The property gets
highlighted on the map.

Update Details
1. Click Know your plot from the tab.
2. Click Update Details from the widget options.
3. On widget enter property and owner details as Pin number, Owner name, Sector name, Plot
number, Property address, mobile number, alternate mobile number, email id and time slot
4. Now the plot gets highlighted on the map.
Know your Plot
1. Click Know your plot from the tab.
2. On widget select ward and plot number from the dropdown list.
3. Now the plot gets highlighted on the map.
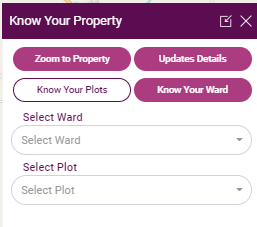
Know your Ward
1. Click know your ward from the tab
2. On widget select ward from the dropdown list.
3. Now the ward gets highlighted on the map and its related information is available on the widget
(Cooperator, Ward Details, Zone Details, Buses, Educational Institutes, Health Facilities, Hotels
and Entertainment, Fire station etc)
Grievance
Help us make Rajkot City GIS citizen portal better by providing us your valuable feedback. You can report
problems (wrong names or other errors), give us suggestions, and compliment us here. We’re always
looking for ways to improve and would love to hear from you.
1. Click Grievance from the menu bar on top of the portal.
2. Choose the grievance type Feedback, Suggestion or Complains
3. Select from Category that best fits your feedback, suggestion or complain (Smart City Initiative,
Public Service, or Others).
4. Add Comments and provide Personal Details.
5. Click on the map to set location co-ordinates or get your current location for your Feedback,
Suggestions or complains.
6. You can also attach the support Photograph, documents for your Feedback, Suggestions or
complains.
7. Click Submit to send feedback & suggestions to us.
8. Click clear to start afresh on the form.
Note: Be as specific as possible and include as much information as you can, so that we can serve you
better.
Announcement
We consider keeping you aware as our most important responsibility. Keep an eye on announcements
module regarding information on any event, meeting, downtime, addition of features, and new data
(such as layers) etc. on the website. The location and point of interest details with related to
announcement can also be viewed on map
Explore the map
Search PlaceSearch provides you with an opportunity to look up for features (e.g. Bus Stops, ATM, Schools etc.) within a category and view their location on the map.
1. Click on the down arrow on the search bar to select search category, type in the search term in the text box at the top left of the portal, as you type, you may see words begin to appear below the search box. These are auto-suggestions that may match what you’re interested in.
2. As actual search result loads, click on the feature result to view location on the map and related information on the pop-up.
Zoom in

Click on the Zoom in icon in left panel to zoom the maps for detail view. Also, you can use mouse scroll to achieve zoom in.
Zoom Out

Click on the Zoom out icon in left panel to zoom out the maps for scale change. Also, you can use mouse scroll to achieve zoom out.
Zoom to Home
Click on icon from the left panel of the portal will reset the map to default extent. This function proves extremely helpful when you zoom in or out too much on the map and wish to return to your original landing page extent.
Current Location
On clicking the icon, symbol displays on the map, showing your current location. The map extent is updated to show the current location as the area of interest.
The first time you visit Citizen Portal, you will have the option to allow or disallow the browser from sharing your location data. If you have denied the permission and would like to change the settings, follow the below steps to enable location sharing on your browser.
Google Chrome
1. Open Chrome.
2. At the top right, click More and then Settings.
3. At the bottom, click Advanced.
4. Under "Privacy and security," click Content settings.
5. Click Location.Turn Ask before accessing on or off.
IE
1. In Internet Explorer, click/tap on Tools (Menu bar or gear icon) and Internet Options.
2. Click/tap on the Privacy tab
3. To Allow Websites to Request Your Location, Uncheck the Never allow websites to request your physical location box, click/tap on OK.
4. Close and reopen Internet Explorer to apply.
Firefox
1. Go to the Tools menu, then select Page Info.
2. Select the Permissions tab.
3. Change the setting for Share Location.
Note: Current location is not supported in the Chrome via https due to Google’s privacy policy. Even in other browsers, the tool will only function when you let the website track your location.
Clear map
Click on the clear map to clear the any displayed result on map
Map Tools

Go to the next map Extent
Click on icon to go to next map extent
Go to the previous map Extent

Click on icon to go to previous map extent
Zoom to extent on coordinates

You can go to the map extent by entering lat long and also can set custom scales by using this map tool
Legends

Legends give you the symbology used in citizen portal for GIS layers
Swipe tool

Swipe tool allow user to swipe between two layers ,you need to select the layer for which you want to swipe between the map .
Tag locator

Tag locator allow user to tag any location on map of citizen portal by giving information in form and by plotting coordinates or use current location.
Upload Kml file

You can upload any kml file around gandhingar city in portal and can view the kml on map.
Polygon Buffer

Polygon buffer allows user to find services/facilities in manual drawn polygon
1. Select layer of services/facilities from drop down.
2. Click draw polygon.
3. The draw pointer gets enable, so you can draw polygon of your area of interest.
4. The result gets highlights on map and left widget
Bookmark

You can create spatial bookmarks for the areas you frequently map to provide a context for other information. A bookmark preserves a particular map extent so that you can come back to it whenever you want. Bookmarks are saved with a map, so anyone who opens a map can quickly zoom to a particular bookmarked area.
1. Click Bookmark icon from bottom left panel of the screen.
2. Zoom to the area on map which you frequently visit. For Example, If Mahatma Mandir is one of your frequently mapped areas, search for it on map. Now, bookmark this map for later use.
3. Add name for the bookmark and click on + to add the bookmark. For example, type ‘Mahatma mandir’ to successfully create the bookmark for Mahatma mandir area.
4. When done, you can come later and click on the Mahatma mandir Area bookmark to view the map zoomed to the map extent and scale saved
5. Click on a bookmark and then delete to remove a bookmark from the system.
Note: The bookmark saved will remain available in the system till cache is not get cleared by the user.
Export Map
You can use the Export map tool to create a file of your active map view. To save a map follow the steps listed below.
1. Open a map.
2. Zoom in and out to reach the map area you want to print.
3. Click the export map icon button from bottom left side of the screen.
4. Select the format, file title, file name, page setup etc from the option
5. Check box if you want to legend on map.
6. Click save, the map gets exported.
Share

You can share the link of the Rajkot GIS - Citizen Portal with others on social media or embed it on a web page.
1. Click Share icon from the bottom left of citizen portal.
2. You will redirected to the social media page where you want to share
3. Now you can share the link on social media
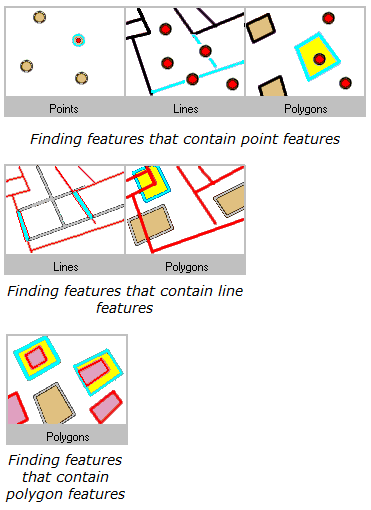
Spartial Query Help
1.Identify the target layer(s) from which features will be selected and check them on [tick symbol]
2.Specify the boundary layer that will be used to select features from the target layer.
3. Choose the spatial relationship rule that will be used for selection
Types of supported spatial queries
The following spatial query methods are supported using Select by Location. In these descriptions, the Target layer is the layer in which features are selected. The Source layer is the layer whose features are used to determine the selection based on its spatial relationship to the target. In the diagrams, selected features are highlighted in cyan where they intersect, are contained within the red source features.
Intersect
Intersect returns any feature that either fully or partially overlaps the source feature(s). Here are some examples: Finding features that intersect with point features
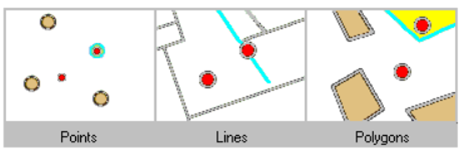
Finding features that intersect with point features
Finding features that intersect with point features
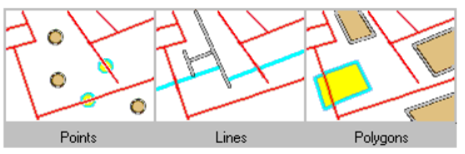
Width
To be selected, the geometry of the target feature must fall inside the geometry of the boundary layer. Selected features and source features can have overlapping boundaries.

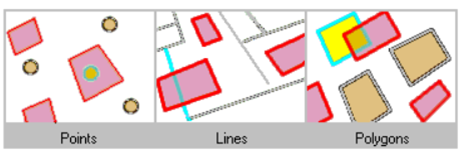
Contain
To be selected, the geometry of the Boundary layer must fall inside the geometry of the target feature including its boundaries. For example, a polygon representing the RMC boundary contains the parks and gardens/Election boundary and is selected even though they share common boundaries along their borders. This is the inverse of the operator "Are within."